Search This Blog

Saturday, September 19, 2020

Partner Plot News: Honey!

This is the story, told in pictures, of how jars of fresh, artisanal honey made their way to the free produce stand in the All Peoples Darius Simmons Community Garden.

These are bee hives.  In nature, bees make their own hives, but bee keepers build these little houses which are just perfect for honey bee colonies.  Each bee in the colony has its own job.  Forager bees are the bees we see in the garden.  Their job is to go out into the world, flying from flower to flower to collect nectar (the sweet juice in the center of the flower). The nectar will be turned into food for the bees in the hive. Pollen from flowers sticks to the bees, so as the bees go from flower to flower, that pollen moves from flower to flower with them.  This pollinating process makes it possible for plants and trees to produce fruits, from apples to zucchini.  This is why taking good care of bees is so important!

When the forager bees come home to the hives, they give the nectar to the house bees. A little bit of bee spit from the forager mixes with the nectar.  A little bit more bee spit mixes in when the nectar goes to the house bee. That bee spit helps the nectar turn into honey.


Inside the hive, the house bees build little hexagonal cylinders out of wax to hold the nectar. After bees squirt the nectar into the wax hexagons, the bees inside the hive make a warm breeze with their wings to remove some of the water from the nectar.  The nectar becomes thicker.  That is how it becomes honey!  To keep the honey fresh, the bees make a little beeswax cap for each hexagonal honey pot. In this photo you can see the honeycomb - all of the little hexagons are filled with honey!


Bee keepers collect honey from the hives by removing some of the honeycomb.  It is important to leave enough honey in the hive so that the bees have food for the winter!  Remember, honey is bee food first, and people food second.

The process of collecting the honeycomb and squeezing out the honey is sticky business!

This is a honey press.

Look at all that honey!!

It's important to remember that raw honey should not be given to children under age 2.

The pressed honey is then decanted into jars.


Good to the last drop!!

And that is the story of how jars of yummy honey made it to the All Peoples produce stand. Thank you to Pastor Larry, the honey team and friends from St. Olaf for this fun Partner Plot Project!!

Saturday, September 12, 2020

Canning Yummy Sauce from Ugly Tomatoes

With all the rain we have had late this summer, the tomatoes have gotten super ripe, super juicy and in some cases, super ugly.  However, just because they are ugly is no reason to toss them into the compost heap.  Here is a little photo journal describing the journey of some slightly ugly tomatoes which I picked from the All Peoples Community Garden.

Remember when these plants were just babies?  Miss Susan picked the ripe
fruits from these rows before I took the picture.  Do you see the big,
beautiful green tomatoes hiding in among the leaves?

In about 5 minutes, I picked these beauties from another row.  You can see
that some of the tomatoes actually are not super beautiful.  Some are a little
squishy and overripe.  Some have cracks and some have spots. A few are really ugly.

Don't let this ugly tomato scare you! The ugly might just
be on the outside!

Notice that removing the spotted skin from the scaly
tomato reveals a perfectly good inside.  Notice that 
cutting into the cracked and goofy-looking tomato also
reveals a lovely inside.  Also notice, a serrated knife with
really small teeth (like a steak knife) is a great knife for cutting tomatoes. 


I cut away skin spots, dirty cracks and the cores (the little green
leafy bits) and this is what the good stuff looked like.


This was my bowl of garbage for the compost.


Maybe you have never seen one of these.  I got this from my
grandmother.  It is a food mill.  You dump your cooked fruit or
vegetable into the cone strainer and push the juice and pulp
out through the little holes with the wooden pestle. You could use
a strainer or a colander in the same way.


I cooked and stirred the tomatoes until they were well cooked.
The longer you cook them, the thicker your sauce will be.
Then I dumped the cooked tomatoes (about 2 cups at a time)
into the cone strainer.  The idea is to push and push until only
bits of skin and seeds are left in the cone, and all the good 
tomato stuff is in the bowl under the strainer.


Skin and seeds go into the compost bowl.


Eventually I ended up with a very full bowl.  It's important
to scrape the thick tomato pulp from the outside of the strainer 
into the bowl too.  If you do not have a food mill or
a strainer or a colander to use, then you need to peel your
tomatoes before making sauce with them.  (I will show
you how to do that in the blog post about making salsa.)

I decided to can my tomato sauce, but you can also freeze it.  These steps below are for canning:

The next step for canning the tomato sauce is to put it into clean, hot jars. (Yes, I know it is
called "canning" but unless you are doing this in a factory, you are using jars.)  Wash
your canning jars, rings and new lids in warm soapy water.  Then keep
the jars hot in a big kettle of simmering water and keep the clean rings and lids on
the clean counter where you are working. Carefully lift the jars* out of
the water one by one (dumping the water out) into the pot and filling them (one by one)
with the tomato sauce.  These are pint jars.  To each pint jar, add 1-2 Tablespoons of lemon
juice and 1/2 teaspoon of pickling salt.  I season my tomato sauce later when I
use it to cook something, so I like to can it plain.  Wipe the rim clean with a clean cloth before 
putting on the clean canning lid.  Screw the rim on just barely tight (not all the way.)

*I have a jar lifter, but if you do not, you can use a big tongs to sort of grab the neck of the jar
with one hand and use a big slotted spoon under the jar with the other hand.  Just be careful
not to touch the boiling water.


This is my big canning kettle.  You can see the water is bubbling.  This is 
where the empty jars were before I filled them, and it is where the full jars get
processed.  This is called a water bath.  The jars need to process in boiling water
for about 30 minutes for pint jars.  During the processing, you will see tiny bubbles
of air coming out from under the rims.  That is the air leaving the inside of the jar. 
This is an important step in making sure your jars seal properly.


After carefully lifting the jars out of the water, set them
on a towel to cool.  Listen for the sound "pop" as each lid becomes sealed to the jar.
Leave the jars on the counter overnight without touching them.  The
next day, carefully unscrew the rim of each jar, one by one,
and check to make sure the seal is secure.  I do that by 
sniffing (can you smell tomato? then the jar is not sealed) and then
turning the jar on its side to make sure it doesn't leak.  If the seal is good, then
screw the rim back on tightly.  Be sure to label your jar with the contents
and the year!  (Tomato Sauce 2020, for example)
Store your sealed jars in a dark, cool place, such as a kitchen cupboard.
If any jars did not seal, just put them in the fridge and use the sauce soon.

If you have any questions about canning products from the garden, there are lots of good books, web sites and smart people you can ask!  One important piece of advice:  Many old cookbooks have instructions for canning which do not apply to the fruits and veggies we grow today.  Today's varieties of tomato are much sweeter than in "the old days" so you must add lemon juice or vinegar to the jars and process the jars (if using a water bath) for longer.  If you ever open a home-canned product and it smells or looks funny, throw it away.

Have fun with your ugly tomatoes!!

Saturday, August 22, 2020

What do you like to make with Beets?

The other day, a friend told me that she had received a couple of beets from the All Peoples garden. She had eaten store-bought, canned beets before, but had never eaten a fresh beet in her whole life. She wanted to know how to cook it. So, let's talk about beets!

Photo credit:  Culinary Hill

Beet Basics

Beets have three basic parts:  the leaves, the stems and the bulb or root. Beets come in different colors, usually described as golden beets or red beets. When we think about eating beets, we usually think about the big round root bulb, but we can actually eat all of these parts of the beet plant.

Beet leaves are great for using in salad, if they are small and tender. Use a scissors or a knife to cut them from the beet stems, and be sure to wash the leaves well. Bigger leaves can be cooked in the same way that you might cook Swiss chard or collard greens.

The stems are also edible, and can be used in the same way that you might use celery. The bigger ones can be tough and stringy, so those might be better off in the compost pile than on your dinner plate.

The beet root itself might be big, might or might be small. The bigger the beet, the tougher it might be. If you want to eat the beet raw, you need to wash it really well, peel it with a potato peeler and then grate it.  There are many recipes online for grated beet salad. Most recipes call for cooked beets. If you have big beets, it is best to cook them.

If you are going to cook your beets, or use them in a recipe such as pickled beets, the easiest way to remove the peel is to boil the beets. Use a scissors or knife to cut the stems, leaving just a little bit of each stem still on the beet. Wash the beets really well, and put them in a pot. Cover them with water and set them on the stove to boil until they are tender enough to stick a fork in them. Do not boil them until they are mushy. You can save that beet water to use for soup stock or as the liquid to make pink tortillas or bread or muffins. Let the beets cool a bit. Stick a fork into the end with the stem bits and gently use a paring knife to slip the skins off toward the fork. Lastly, set the beet down and cut off the stem end, like you would an onion.

The cooked, peeled beets are then ready to eat. You can eat them warm or make a beet salad or use them in a recipe. When I was growing up, we picked beets and ate them several times each week, usually warm with a little butter on them (which I personally DO NOT like). My grandmothers always canned jars and jars of pickled beets every summer (which I personally LOVE). If I have beets, I usually make beet salad with goat cheese or I make pickled beets.

This year, I was looking through my grandma's cookbooks and found a recipe for Beet Relish, submitted to a community cookbook in 1923. I decided to give it a try, and I am very glad I did!

Beet Relish Recipe

This is the original recipe as it appears in the cookbook.


I put my cooked, peeled beets into my food processor.  I scooped one cup
of ground beets into a measuring cup, and estimated I had 1 1/2 cups total.
This is where fraction math comes in handy!  1 1/2 cups, or 3/2 cups is 3/4 of
the original recipe.  Multiply each ingredient by 3/4 to make the adjustment.
If you need help with that, be sure to contact Miss Linda for  math lesson
at Peeps Academy!

This is what the beet relish looked like once I added all of the other
ingredients.  

I like to store relish and pesto in small canning jars. Because there
is butter in this recipe, the relish cannot be canned in sealed jars for storing
in the pantry. Instead, it is best stored in the freezer.

It is important to label your homemade items so you are sure to use the
oldest things first. 


Are you curious about this?  Do you see my frozen saved beet water?
This is the collection of stuff I saved from one week of harvesting, freezing,
canning and cooking. The celery water and beet water melt down with the
vegetable scraps to make a nice vegetable stock, which I cooked, strained and froze for soup.

What kinds of things do you like to make with beets? Maybe you can try out a new recipe and post a photo in the comments.

Note:  Beets are very good for you and if you eat a bunch of the red ones, yes, your pee will turn pink.

Submitted by Linda Muth

Wednesday, August 19, 2020

Partner Plot News, Fresh from the Corn Field

Our friend, Steve, was busy with his camera during the last 2 weeks, as teams from St. Olaf and All Peoples harvested corn fresh from the partner field!  Neither heat, nor pending storms kept the team from completing its mission!  Everyone involved had fun, learned a lot and says THANK YOU!

This team helped collect the first batch of corn for the All Peoples vegetable stand.
The community was so excited to get its first taste of fresh, Wisconsin sweet corn!

Check out how beautiful all of the produce grown in St. Olaf partner
plots looks at the free produce stand!

It's so much fun when we work together!
St. Olaf friends will recognize this woman doing her part.

The littlest harvester was a pretty great helper!

Our friend Steve calls this "four-handed picking"


What's the last you thing you did before heading off to college?  Picked corn, of course!


Always stop to smell the flowers.  And photograph bees.

Photos submitted by St. Olaf Lutheran Church, Rubicon, WI


Saturday, August 8, 2020

Joy from a Cherry Tree

The Little White Bags

So this was back in the early summertime, right when we were still picking pounds and pounds of cherries off of the cherry tree in the middle of the church's garden. We had finished picking cherries off of the tree for the day and had placed a reasonable amount of cherries in little white paper bags for the community to take for free. We had to have placed dozens of those little white backs on the produce stand that sits on the corner of 2nd and Clarke St. My mom, my God brother, and I then set off to run some errands, telling a few people about the free cherries on the garden stand before we took off on our errands. As we were driving back on Martin Luther King Drive, just a few blocks from the garden, we saw a mother and daughter. Both had one of the white bags in their hands and it was so adorable to see the two of them chomping down on the cherries as they talked and laughed together. It was a great chance to see our produce in the hands of a loving mother and daughter pair and knowing that the fruit I just picked from the tree was contributing to their joyful happiness. Seeing that moment immediately became one of the many reasons why I love working in the garden year after year and made me truly realize how impactful a little garden on the corner of a block can really be!

Helpers in the garden, picking cherries

Story submitted by Tara Holty, one of the APC team of youth leaders in the Kids Working to Succeed Program.

Wednesday, July 22, 2020

Lunch! Fun for the Whole Family

One of the historic components of All Peoples Kids Working to Succeed program has been the bag lunch.  At the end of a morning of KWTS work in the garden, student participants, youth leaders and adult teachers would gather in the church basement or on the church steps and eat lunch together.  Each participant would receive a bag lunch, lovingly prepared by folks from one of All Peoples' partner churches.  At the height of the summer, 30 to 40 kids, youth and adults would eat lunch together, 3 days per week, for 8-10 weeks.  

Yes, that's a lot of lunches, and you might be thinking:  what a daunting task to make and deliver all of those lunches!  However, when many hands from many families from many partner communities each made lunches for a day or two, the bag lunch program was very manageable.  The biggest challenge has always been refrigerator space at the church!

Welcome to the summer of Covid-19, when the Kids Working to Succeed program has been completely re-imagined, including the lunches.  Students participate 3 days per week, with online and home activities and one day per week in the garden.  Recognizing that families depend on KWTS lunches as a source of summer nutrition for their children, program leaders designed a way for families to have 3 lunches per week at home as part of the program.  Each Monday, students come to the church with their grown-up to pick up their KWTS supplies for the online and home activities as well as their Grocery Bag Lunches.

Grocery Bag Lunches consist of provisions for lunch for a family of 5 for 3 days per week.   This summer, there are 12 families with kids in the KWTS program.  At first, partner churches were skeptical about this new lunch model.  Grocery shopping for 12 families for 3 days of lunches for 5 people - that's 180 lunches!  However, if you think about making lunch for 3 days for your family of 5 and needing to grocery shop for that times 12, maybe it doesn't seem quite so daunting.  

Well, with just a little encouragement, the partners accepted the challenge.  Hopefully, they are feeling positive about Grocery Bag Lunches on their end, because by mid-summer, All Peoples is claiming Grocery Bag Lunch a success!  In fact, here are some messages which have come in from KWTS families:

[We received] the best lunches today, 3 bags of food separated into 3 categories, spaghetti and meatballs lunch, sub sandwich lunch, and hot dog lunches with ALL the fixings.  These actually brought tears to my eyes because all of our kids go home with this fabulous stuff!!  Not just a basic bag lunch.  It even excites [my husband].
My son feels proud to bring these lunches home for the family.
These lunches are making something new happen for us.  We are actually making lunch and eating it together.  I like this family time better than the old way.
Partners have been impressively creative, have baked dozens and dozens of homemade cookies, have packed groceries in re-useable bags - it is beautiful!  The love that goes into shopping and organizing is very apparent to the families.

From a logistics perspective, the Grocery Bag Lunch program has been very easy to manage.  If a family has transportation challenges, delivering the Grocery bags to their  home as a porch drop on Monday has worked well.  Keeping the items in bulk packaging has eliminated the trash problem that has sometimes been an issue around the church.  

Maybe you are wondering why Grocery Bag Lunches are a topic in the Harvest Hands Blog.  All Peoples grows food as part of an overall commitment to food justice ministry and increasing food security for families that struggle to put daily bread on the table.  Grocery bag lunches are literally helping our kids to grow as they grow food for their community.  This story is one way in which All Peoples can highlight the ways in which many hands are coming together to do this food justice work and to say thank you.

KWTS small group working in the garden


Friday, July 17, 2020

Kohlrabi - It looks like an Alien

If you grew up in Wisconsin, you probably grew up eating raw kohlrabi.  In my home, we had kohlrabi slices next to our sandwiches instead of potato chips (and as kids, we were not too happy about that).

Yet, if you grew up with this vegetable and you have not had it for a while, you might find a taste of it will bring back fond memories.  It does make a great snack, and the new juicier, tender varieties taste better than you will remember.

Kohlrabi (pronounce it like coal-robby) is in the family of vegetables that includes turnips, rutabaga, Brussels sprouts, cabbage, kale, broccoli and cauliflower.   These vegetables mostly were grown in Europe and then later brought to the Americas.  Kohlrabi is popular in the US with families of German heritage.  Even the name is German:  Khol for cabbage and Rabi for turnip.  

Wisconsin's cooler climate is very similar to the climate in Germany, and kohlrabi grows really well here.  The plant looks pretty weird as it grows.  The leaves are light green, and are good to cook and eat just like you would cook collard greens or kale.  The bulb part grows above the soil, and is actually part of the stem.  It can be white-ish, light green and even purple.  No matter the color of the stems or the bulb on the outside, the inside of the kohlrabi bulb is bright white.  

Small kohlrabi bulb growing in the All Peoples
Darius Simmons Community Garden

If you are growing kohlrabi, don't let it get too big!  Most varieties of kohrabi get tough or "woody" (hard to chew, like if you were trying to chew wood) if the bulb gets too big.  When the bulb is about the size of a baseball, it is just right for picking.  A softball size kohlrabi will be too big and tough to eat.

When it is ready, you can harvest the kohlrabi by picking the plant right up out of the soil.  Cut off the leaves and wash them.  Cut them up and prepare them just like you would any kind of green.

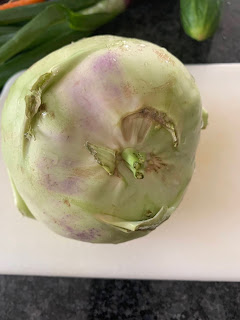
The top of the kohlrabi bulb

The bottom or root side of the kohlrabi bulb

The bulb is prepared by peeling it.  Like rutabaga, kohlrabi has a waxy outside skin and an inner tough skin.  You need peel off the skin in order to eat kohlrabi raw or to cook it.  

Cut a thin slice to cut the top off

The root side can be tough, find the place
where it is tender and cut it off

Inside, the flesh is white and juicy

Use a sharp knife to carefully peel away the waxy outer
and green inner skin. 

Once the kohlrabi is peeled, you can cut it up however you like.

Raw kohlrabi is good to eat in slices, chopped or shredded on salads.  It is also a good vegetable to serve with dip or hummus.  


Thin slices or strips of kohlrabi are very good as a substitute for bamboo shoots in Chinese dishes or as a nice crunchy addition to any stir fry.


So if you come on over to the All Peoples garden and you see these weird green or purple balls with leaves growing out of them, you have found the kohlrabi.  They do look a little bit like garden aliens.  Usually kohlrabi are ready to harvest in early to mid-July.  Maybe you will get lucky and can find some freshly harvested kohlrabi on the garden stand so you can take it home and try it.